Amateur bird veterinarian
As of late, I seem to spend a lot of time fixing film cameras. Could have something to do with my role as TA for a photography class at MIT (EC.305) or my excess spending on admittedly crappy vintage film equipment. I swear it was such a good deal on eBay!
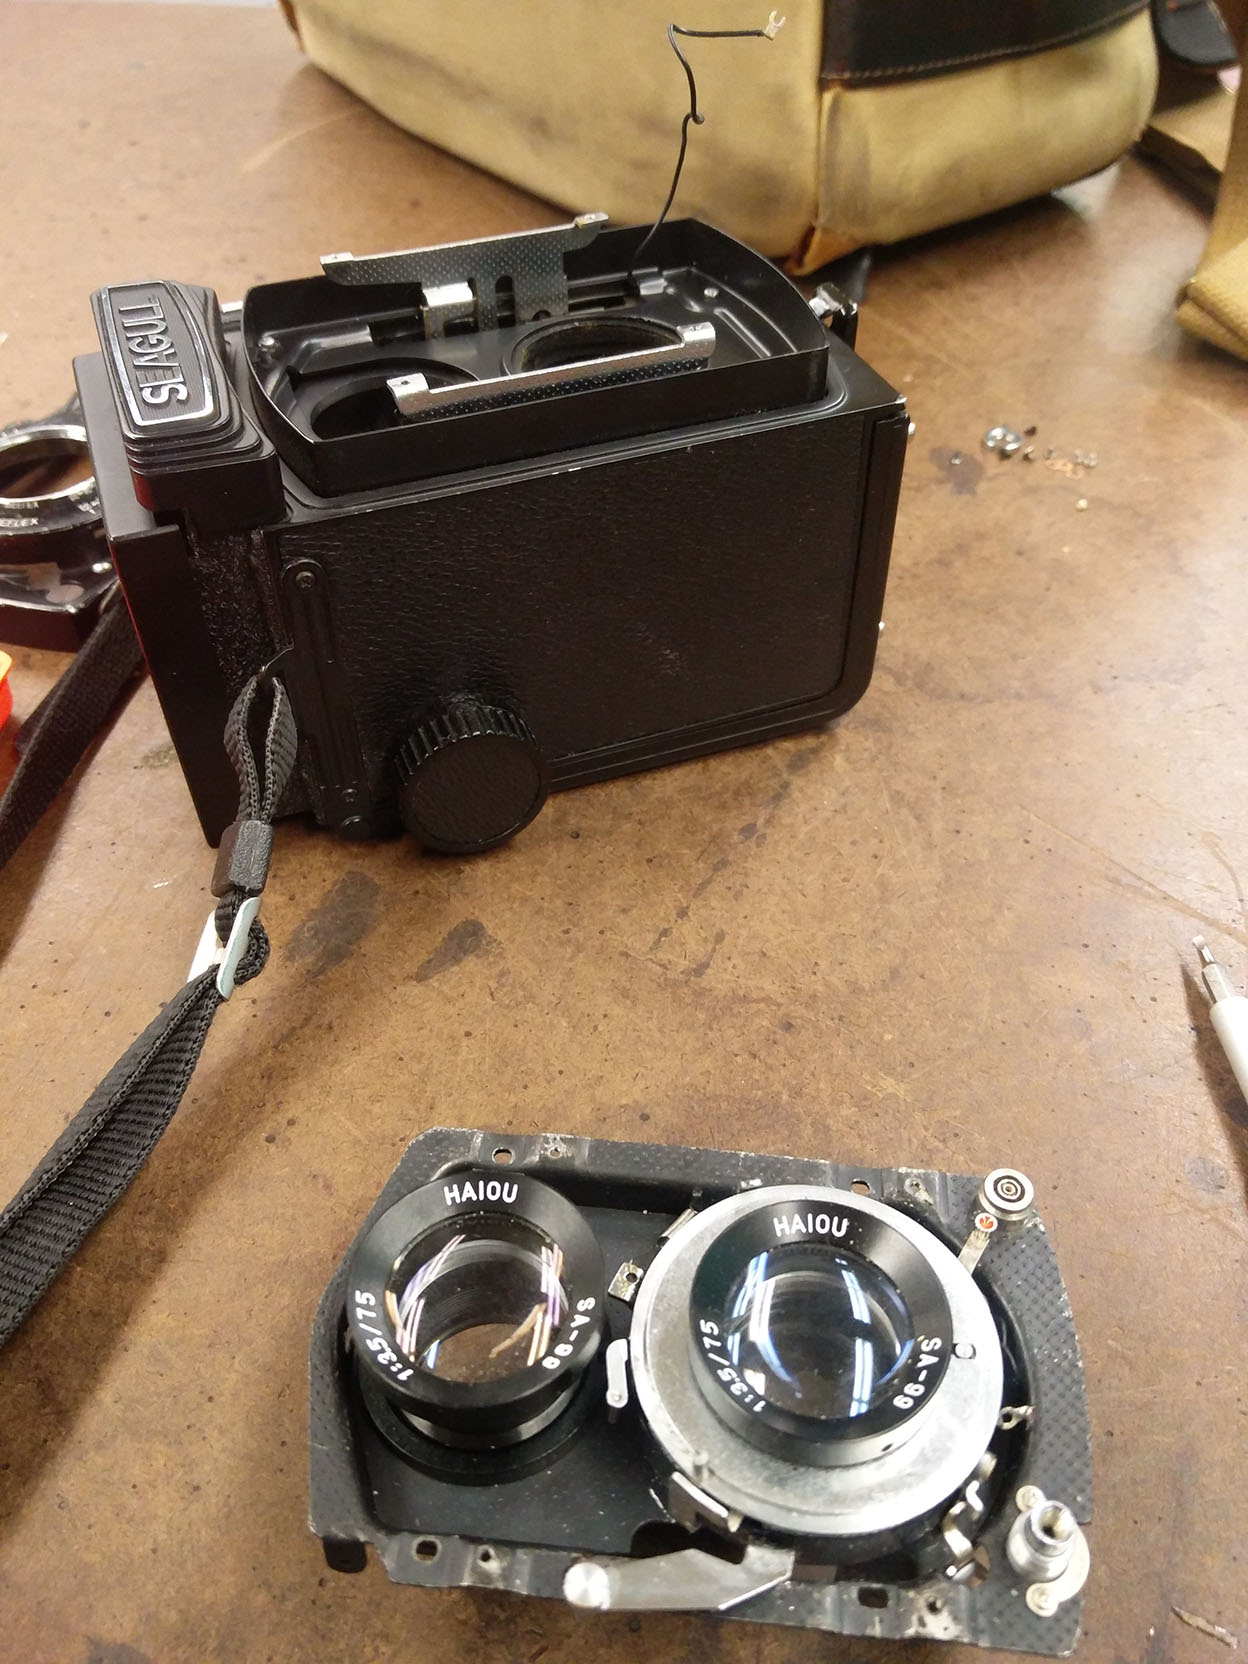
Anyways, the camera I’m attempting to coax back to life today is a Seagull TLR medium format camera. The camera belongs to the class I’m TAing for and is used primarily for show-and-tell since the camera doesn’t work and most students will only shoot 35mm film.
As far as prognoses go, this one could be a lot worse. The camera seems to be mostly functional with the sole exception of the shutter mechanism, which doesn’t seem to cock or fire. I intended to give a shot at fixing the camera. Finally, after weeks of anticipation, I had enough time to sit down on a Saturday and take apart the camera. Before we do that though let me just add a little more about this particular Seagull and medium format TLR cameras.
Larus Chinesiknockoficus
The Seagull Camera Company came onto the photography scene in 1958. They produced a variety of cameras including SLR, TLR, and foldable, however, they’re probably best known for their Rolleicord knockoff TLRs. Fun fact, they also happen to be the oldest camera manufacturer in China. The particular model of TLR that I am working on is the Seagull 4B-1. Interestingly, Seagull actually produced a different branding plate for domestic and international versions of this camera. The one I have (photo below) has “Seagull” written across the top whereas a person buying this camera back in mainland China would have gotten one with Seagull written in Chinese. Now I’m not going to lie: my Chinese reading ability is barely at a second grade level, but the top plate in Chinese is far cooler aesthetically than the English version.
 The Seagull 4B takes medium format film and produces negatives of either 6x6 or 645 if you have the right mask. If you are confused about film sizes and formats, I recommend this excellent post on the subject by Ken Rockwell on his website. The camera requires no batteries to operate which is a plus and is entirely manual exposure and focus. This means you need an external light meter or a really good eye to get the proper exposure on your shots.
The two lenses are not interchangeable, although I suppose if you were incredibly endeavoring you could manage to switch it out, as they are just screwed into the lens plate. The camera can be set to expose from 1 to 1⁄300 of a second and also boasts a bulb setting for longer exposures. The aperture can be set between f22 to f3.5. The shutter is built into the lens, known as a leaf shutter.
This camera is also notable for being a twin lens reflex. This just means that the camera has two lens: one from which you view the subject your are photographing, and another for taking the actual photo. Of course this differs from the more common single lens reflex or SLR cameras, which use only a single lens for viewing and taking. If you are inexperienced with photography you might be wondering what all the fuss is about. Why make the distinction between viewing and taking? Most cameras only have one lens after all. The reason people go through the trouble of making SLR or TLR cameras instead of just smart phone or point-and-shoot camera is to maintain the fidelity between the image you see through the view finder and the one the camera will take. This is important mostly so the photographer can accurately gauge what the final photo will look like before applying adjustments. The closer the image is to the one you’re trying to take means less tweaking in the darkroom or Photoshop after. One of the advantages of a TLR over a SLR is the reduced shaking and noise when you take a shot since the camera does not have a mirror that needs to be flipped up and down.

Please ignore the angelic lighting. The camera is also missing the leather stickers in this photo since I had already peeled it off to access the screws.
Camera Autopsy
Finally, we get to crack open the camera. After carefully peeling off the leather for reattachment in the future and removing a couple of small Phillips screws, the whole front plate of the camera can be removed. It’s probably useful to note that screwing around with the f-stop and shutter speed dials after this is not the best idea as reattaching the cover requires them to be lined up. Since we’re screwing around with the camera we’re going to do it anyways. Lining up the dials again is possible, but just a pain. After some more fiddling we finally get to look at the guts of the shutter mechanism.


At this point, the plate that holds the lenses and shutter mechanism can be removed after unscrewing four slotted screws. The flash sync port needs to be carefully disconnected from this plate otherwise you’ll have to deal with the wire connecting the plate back to the body of the camera.
Now we can remove the taking lens by unscrewing it from its threaded socket. Underneath, the plate that covers the shutter mechanism is held in place by a large retaining ring with a single thread. I had initially thought it was a latching mechanism and almost ruined the ring by prying it off. Don’t do this! After undoing the plate and upon closer inspection, it became obvious that the shutter mechanism had simply jammed halfway between being cocked and fully-fired. Luckily, it was easily fixed by pushing the timing pin back into the fully-fired position. After this the camera could be successfully cocked and fired. Great success!
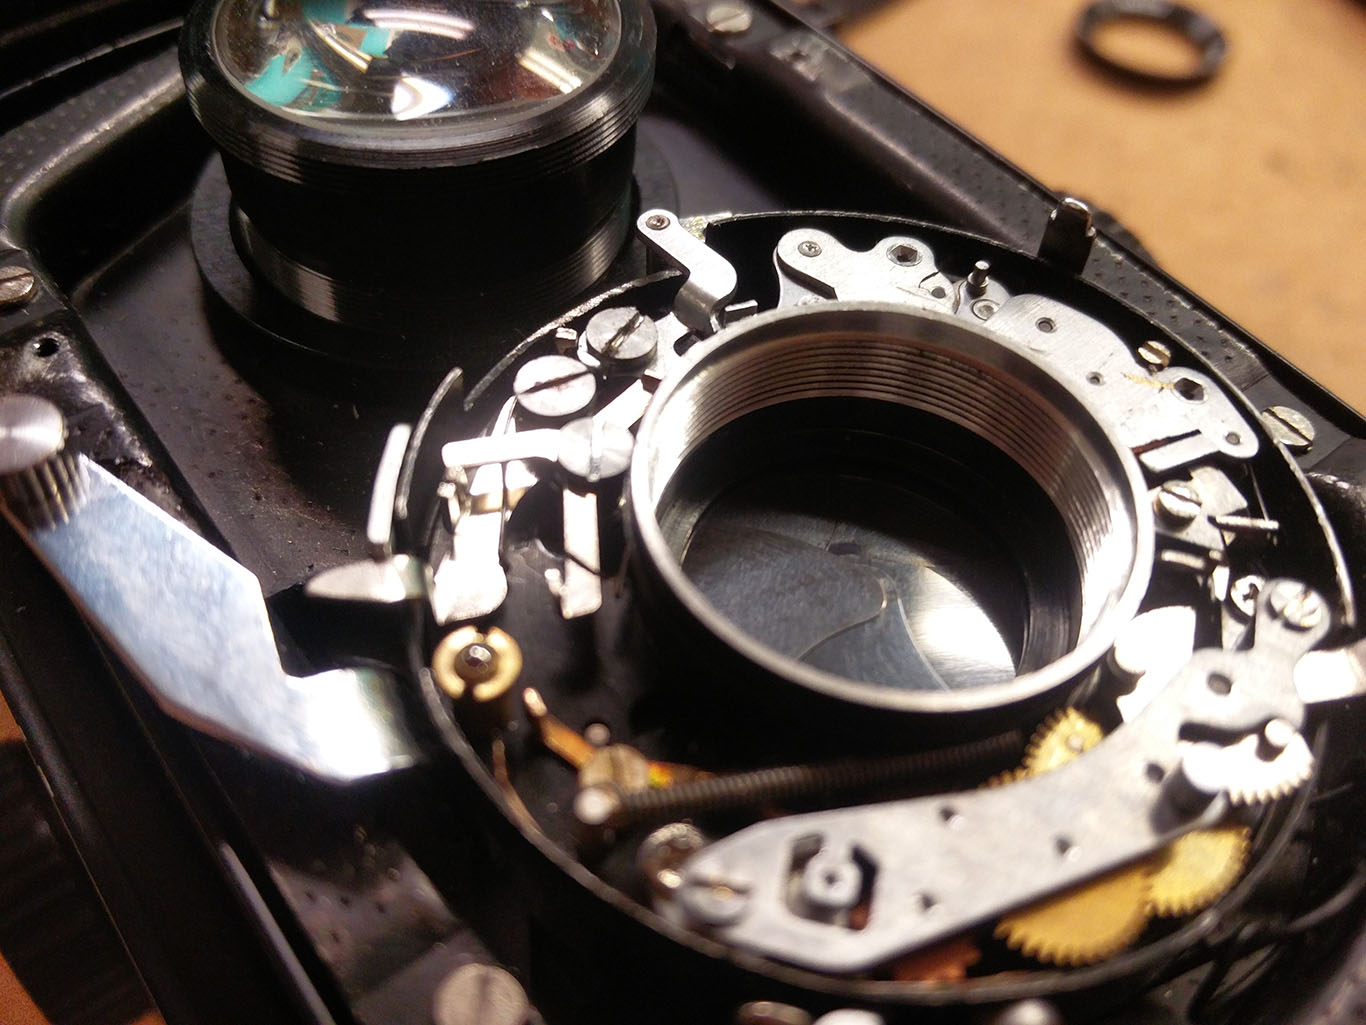
The shutter and timing mechanism themselves are absolutely marvelous and I can see why this camera was so popular with amateur photographers when it first came out. I’ll probably write another post just to explore how this mechanism works. Other than its tendency to jam the camera is excellent as an introduction to medium format and TLR cameras especially at its price point. They sure don’t make Chinese knockoffs like they use to!
This is My Jam
Okay, case closed. Well sort of. At this point, I still haven’t quite figured out the exact reason why the shutter jams. After putting the camera back together and excitedly loading a roll of film into it, the shutter ended up jamming again after the sixth or so shot. Blasted! I had thought the rest of the roll was wasted, but as it turns out you can remove the front cover without exposing the back of the camera so I took apart the camera and unjammed the shutter again. In terms of actually using this camera to shoot, this is certainly impractical as it takes about fifteen minutes just to get the camera apart and even longer to put it back together, and every subsequent jam is a chance to lose one of the tiny screws when taking it apart.
I had a couple of ideas at this point. After taking the camera apart once again and playing around with the shutter mechanism, the jams seems to be a result of fiddling with the cocking mechanism before the shutter had fully fired. Additionally, it appears that putting on the cover had some correlation to increase in jams, perhaps something is catching on the cover. Here’s a slow motion video I took of the shutter firing to try to diagnose the root of the problem. It wasn’t very helpful in that regard, but it’s still pretty neat.
In the future, when I take a closer look at the shutter mechanism I might finally ascertain the cause, but for now I think my plan is to make and install a transparent cover with access to the shutter mechanism so I can easily undo the jam if need be while showing off the cool bells and whistles underneath the hood. More posts to come, including one about my experience actually shooting with the camera and some photos.